Hey all,
Just want to announce that Hilton Yam and I have started a news and information site that will supersede our individual blogs. All my posts have been imported and will be archived on the new site for your convenience and reference. All new posts will be posted there and not here.
Please go over and check it out: http://www.modernserviceweapons.com
Thanks and see you over there!
Tim
Wednesday, October 31, 2012
Friday, September 7, 2012
Thorntail Light Mount by Haley Strategic Partners

Thorntail Light Mount Review
by Tim Lau
In the past decade, tactical techniques, procedures and equipment have evolved quite a bit, thanks to lessons learned from overseas and the influence from the competitive shooting community. For example, many trainers and shooters prefer controlling the gun closer toward the muzzle to more efficiently control recoil and aggressively drive the gun to the target. Another trend is the use of two point adjustable slings on the carbine.
With these preferences in mind, when setting up a carbine it quickly becomes clear that the sling mount, light mount, and the shooter's support hand are all competing for the same piece of real estate. This is true even when running an extended forend, and is exacerbated when a shorter, 7-inch rail is used.
When it comes to light mounts, I generally shy away from tape switches as the pads are high wear items and wires can become a snag hazard. However, I want to be able to hold the carbine and run the light when shooting strong or support side. I experimented with several setups, but was never quite satisfied until Travis Haley introduced his Thorntail Light Mount. This low profile mount pushes the light forward allowing the shooter to place his hand further forward on the rail. This increases usable space for gripping the gun. It also de-conflicts the light mount from the sling mount.

The mount is completely modular and fully reversible. It is available in various diameters to accommodate the aluminum and polymer handhelds from SureFire, along with a model specifically designed to interface with the Scout light.
The Thorntail Light Mount is available through Brownells.

Monday, July 2, 2012
Apex Tactical Glock Extractor
For thirty years, Glock 9mm handguns have been nearly synonymous with reliability, but recently, many Glock owners have been suffering from erratic and sometimes failed ejection with their Glock 9mm pistols. Numerous theories populate the various Internet gun forums, but so far there has been no definitive answer from Glock as to the cause, or a solution. Glock Customer Service responses range from total denial, instructions to send the gun in for repair, or sending out replacement parts to local armorers.
It seems the erratic ejection issues appeared somewhere around the "M" serial number prefix in the Gen 3 9mm pistols, and possibly affect all Gen 4 9mm guns.
One popular "fix" is to obtain the latest Gen 4 9mm ejector (Part Number 30274), which for most people, seems to make ejection a little more consistent but doesn't always solve the problem. Others recommend the HRED extractor plunger assembly by White Sound Defense, but this product did nothing for me.
10-8 Staff Instructor Joe Riedy hooked me up with a couple of the Gen 4 ejectors. So I swapped the ejectors out in both my 17 RTFs post haste. Hearing of my woes, our good friend Randy Lee at Apex Tactical sent out a pre-production prototype of their Glock extractor. The kit comes complete with a replacement spring for the extractor assembly.
The extractor and spring went in the gun with no problems, so off to the range I went. Shooting a variety of ammunition, including Federal 115 gr, Winchester White Box, and Winchester Ranger 127gr +P+, extraction was now consistent with cases going about 4-5 o'clock.
I decided to really push the extractor to its limits and shoot the gun with no magazine in the gun. This test is not designed to simulate a tactical necessity, but rather to push the extractor to its limit. When there is a magazine in the gun, it will help stabilize the empty case during extraction and ejection. Without the magazine, the extractor must do all the work by itself. In a Glock, this is not an issue since the feed lip geometry is designed to function in this manner. (In a 1911, this is a completely different story.)
If a pistol has an extractor can can reliably extract and eject empty cases with no magazine inserted, and reliably feed and function, this means it is at optimal function. Try this with your factory Glock and you will see it will not do this. I performed this test with the Apex Glock Extractor and it consistently ejected the empty case of every cartridge fired.
The folks at Apex Tactical believe in thoroughly vetting every product before releasing it to the market, and this one is still in the beta stage. I have about 350 rounds through my prototype and the gun has yet to malfunction. I have enough faith in the product use it in the Pro Am Match in Frostproof, FL next week.
When these hit the market, I will be buying a dozen!
Tim Lau
10-8 Consulting, LLC
Source:
http://www.apextactical.com
Saturday, June 16, 2012
SIRT Drills: Maintenance Drill #2

Earlier this week, my good friend Hilton Yam posted on the 10-8 Performance Blog a simple maintenance set of drills that can be done with the SIRT pistol from Next Level Training. It's an excellent way to get 40 quality trigger presses in from every (normal) way one might hold the pistol. Hilton's post reminded me of a warmup I used to do to start off every range session.
The set is very simple:
10 reps: From the holster, draw and fire one round, strong hand supported (freestyle)
10 reps: From the holster, draw and fire one round, strong hand only
10 reps: From the ready position of your choice, fire one round, support hand supported (freestyle, support side)
10 reps: From the ready position of your choice, fire one round, support hand only
Difficulty is set by the user. I normally do this on our 10-8 Dry Fire Target which allows you to set the difficulty by simply choosing a target that is scaled for a longer distance. So depending on the day, you can either focus on extreme speed or developing trigger mechanics on the 25 yard target.
This is also a great drill set to do live fire on the range.
Like Hilton's Maintenance Drill, this set takes very little time to complete, but reinforces and develops trigger control, sight acquisition, and presentations from all conventional methods of holding the pistol. We all know we should develop our support hand skills, but it is hard work and not much fun to do since most people's support hand feels retarded compared to their strong hand. This drill set requires very little time commitment but incrementally develops our support hand skills.
Add this drill set to your training regimen and watch your skills grow!
Sunday, June 10, 2012
Guide to Thread Locking Compounds

Here are the compounds I keep on hand both in the shop and inside my range bag, and what I use them for.
Loctite 242 (Blue)
This is what I end up using most. It is best for applications where you want screws to stay put, but may need to loosen them for periodic maintenance. I use Loctite 242 on all sorts of screws that need to stay in place, but not permanently. These include screws for 1911 grips, M4 rail mounts, light mounts, optic mounts, sling mounts, etc., I also use this for sight screws for the rear sight on pistols. Remember that a properly fitted sight should fit snugly and the screw should not be the primary source of tension in the dovetail.
Some optic or light mounts are secured via a thumb screw, and I always hit these with a bit of 242 as well. If this doesn't secure it, you may have to try 271 to hold them in place.
Loctite 638
I started using Loctite 638 Retaining Compound at the suggestion of my good friend Hilton Yam, who had discovered it was far more robust than Loctite 271 (Red) or Black MAX for permanent application. I recommend using this compound for permanent or semi-permanent installations of parts, such as final installs of 1911 front sights or plunger tubes. Some rifle manufacturers use it for permanent installations of gas blocks on M4 type rifles. Since using this compound on plunger tubes, I have yet to have one come loose (with proper staking, of course.)
Loctite 271 (Red)
There are still some good uses for 271, where you want something more robust than 242 yet less permanent than 638. Examples of this might be 1911 grip screw bushings (you don't want those coming out every time you unscrew your grip screws) or some stubborn roll pins that just keep wanting to wander out.
While appropriate thread locking compound is good insurance, I still hit all critical screws with a paint pen to make witness marks. This will make it easy to tell if any screws begin to back out.
Do you have any handy uses for Loctite that you'd like to share? Hit me up and let me know!
Tim Lau
10-8 Consulting, LLC
Saturday, June 9, 2012
Aimpoint CCO Training at Telluric Group

I just returned home from an Aimpoint media event and training course hosted at the Telluric Group training facility in Brunswick, GA. Now this was a bit of preaching to the choir on Aimpoint's part, as I have been an end user and believer in the Aimpoint red dot sight for over a decade. I will be covering the specifics regarding the training in an upcoming article and sidebar for Soldier of Fortune Magazine, but some notable news:
Telluric Group is now the official training provider for Aimpoint. They have developed a specific curriculum for professional end users that covers operation and maintenance of the Aimpoint red dot sighting system. The folks at Telluric Group come from a varied background consisting of military special operations and law enforcement tactical teams. Their staff and facility are excellent and well suited for the type of training they provide.
 |
| The Aimpoint PRO coupled with LaRue Tactical's M68 CCO Mount: a match made in heaven. |
As many customers and dealers are already aware, the extremely popular Aimpoint PRO (Patrol Rifle Optic) is now available for commercial sales. This affordable optic comes complete with the robust Rail Grabber mount, yet has all the features requested by professional end users: 2 MOA dot, night vision compatibility, extended battery life (30,000 hours or approx 3 years continuous use), and Aimpoint's legendary durability and reliability.
Special thanks to Daniel Defense for providing the guns for the training. We also had a special visit from the fine folks at Blue Force Gear, who provided pouches and slings for the event. The instructors at Telluric Group were experienced, knowledgeable, and consummate professionals. I look forward to returning for more training with them, specifically for their Night Vision Operator's Course.
If you get a chance, visit the above linked sites and let us know what you think!
Tim Lau
10-8 Consulting, LLC
Wednesday, May 16, 2012
Fitting a New Plunger Tube on your 1911
 |
| A loose plunger tube can prevent your 1911 from firing |
Fitting a New Plunger Tube on your 1911
By Tim Lau
One of the great things about the 1911 is that every part on the gun is replaceable. The downside is that stuff wears out and/or comes loose. Combine this with the proliferation of sub quality parts common with many manufacturers, and this can be a recipe for disaster. I have found that current production Kimbers are plagued with plunger tubes that give way sooner rather than later. If the stakes give way and the tube is not properly supported by the grips as originally designed, the plunger tube can work itself far enough from the frame to prevent you from being able to disengage the safety and fire the pistol. This isn't typically regarded as a good thing.
Here I will discuss how I fit a new plunger tube. Done this way, I have yet to experience one of my stakes come loose (and I have done a few.) You will need the following (Brownells P/N's provided for your reference):
10-8 Performance Plunger Tube (http://www.10-8performance.com/products/Plunger-Tube.html)
Loctite 638 Retaining Compound 532-000-008
Gun Runners Plunger Tube Staking Tool 634-000-001
Crescent Wrench
Bench Vise
 |
| Remove the loose tube with the help of your vise |
The first order of business is to remove the loose plunger tube if it hasn't fallen off already. After removing the grips and thumb safety, I will clamp the loose tube in my bench vise and lightly tap the frame with a nylon faced hammer to separate the frame from the plunger tube. Once you have done this, clean the staking holes and the portion of the frame that contacts the plunger tube with acetone or your favorite degreaser.
 |
| A drop of Loctite 638 retaining compound on each stake will help reinforce them |
Take your new plunger tube and wipe it off with some degreaser. I place a drop of Loctite 638 Retaining Compound on each stake prior to attaching the plunger tube to the frame. The stuff is viscous and significantly stronger than "red" Loctite. Next, install the tube into the frame. Remember the smaller diameter end of the plunger tube faces the muzzle end of the pistol.
 |
| The Gunrunners Plunger Staking Tool |
There are several plunger tube staking tools on the market and many of them work well. I prefer the one from Gunrunners. The one fashioned from vise grips works okay as well. I have also used the one from EGW but that one has the least amount of control as far as the quality of the stakes. It works but the Gunrunners one works best for me.
The Gunrunners tool consists of a staking point and a bolt that is mated to a spot faced bar that holds and reinforces the plunger tube. First place the reinforcement bar on the tube and then align the staking point with the stakes on the plunger tube (which should be in the frame by now). The bolt should align with one of the round recesses on the outside of the reinforcement bar. Hand tighten and then tighten with a wrench until reasonably tight. Repeat with other staking point.
 |
| Align the staking point with the staking hole on the inside of the magazine well. |
Once both stakes are set, be sure to wipe off any excess retaining compound. Check your stakes. They should be strong and even. See below:
 |
| Nice strong stakes on both points. |
Double check your work by trying to wiggle the plunger tube. Reassemble and check for function. Remember that properly designed grips will support the plunger tube and keep it from coming loose and failing even if the stakes give way. This built in failsafe is gone if you choose to install thin grips or any grips with a differing design than the original.
 |
| I prefer full width grips that properly support the plunger tube like these from VZ Grips. |
Once you have confirmed function, you can pat yourself on the back and have a beer. Good work!
Resources:
Brownells.com http://www.brownells.com
VZ Grips http://www.vzgrips.com
10-8 Performance, LLC http://www.10-8performance.com
Wednesday, May 2, 2012
Rotate Your Carry Ammunition
 |
| Winchester Ranger RA45TP with Multiple Hard Primer Strikes, but No Ignition |
Just wanted to put out a quick reminder to everyone to periodically rotate carry ammunition. Recently, there was an advisory from Gwinett County (GA) PD regarding an incident where an officer found himself in a deadly force encounter only to discover that the chambered round in his duty pistol would not fire. Fortunately, the officer's training took over and he was able to successfully clear the malfunction and end the encounter.
The round in question was examined by the manufacturer, who discovered that the primer mix had been knocked out of the primer when the round was cycled through the firearm multiple times. Two cases of the same ammunition (presumably from the same lot) were tested and functioned normally.
Recently, one of my Detective partners and I were teaching at the range when three carry rounds failed to fire. We examined the firing pin strike and saw they were solid, centered strikes. We are now in the process of rotating all officers' duty ammunition, which we typically do once a year.
Federal, Remington and Winchester all recommend that cartridges should not be chambered more than twice before being discarded. Bullet setback can cause pressure spikes and primers can go dead. In an AR or M4 type carbine, this is even more critical as the chambering process is very hard on the cartridge.
In the end, I wouldn't lose a ton of sleep over this, but it is good practice to regularly rotate the ammunition in your duty sidearm or carbine. This is not the area where you want to go cheap.
Be safe out there!
Tim Lau
10-8 Consulting, LLC
Sunday, April 29, 2012
Understanding the 1911 Extractor Test
 |
| What happens when the 1911 extractor fails |
Understanding the 1911 Extractor Test
by Tim Lau
Recently, there has been a bit of discussion on the 1911 "Extractor Test" and it became clear that many, if not most, don't understand how to interpret the results or how it applies to 1911 function and why the test is not applicable to most modern service pistols. I will attempt to shed some light on this.
The 1911 Extractor Function Test
First of all, let's describe the test. I first learned heard of this test from my friends Hilton Yam and Larry Vickers. Others, such as Wilson Combat, have shared it online as well.
The test is simple: fire a prescribed number of rounds through the pistol without a magazine inserted. In the 10-8 1911 Function test, we shoot 16 rounds this way. Eight are fired two handed and eight more are fired strong hand only.
The empty cases must properly eject between 2 o'clock and 5 o'clock. If any cases go forward, to the left, stovepipe, into your face, or fall through the magazine well, the pistol has failed this test.
Having a magazine in the pistol supports the empty case during extraction and ejection phase of the cycle of operation, which can mask issues such as poor extractor tension or geometry.
Some folks have said they only fire five to seven rounds this way to evaluate extractor function, but Hilton and I have both found that with higher pressure duty rounds, extractor issues may not exhibit themselves in only seven rounds. If the 1911 can make it through two magazines' worth of ammunition without failing, it is likely good to go.
Why is this test significant?
This test is designed specifically to test the extractor function in 1911 pistols. Let me repeat: This test is designed specifically to test extractor function in 1911 pistols. It tells you if your extractor is at 100% function or not. If the pistol fails this test, it is not at 100% function. This is significant for two big reasons:
1. The internal extractor design of the 1911 relies on leaf spring tension, which is highly variable. Depending on the materials used by the manufacturer, and the service cycle of the pistol, the 1911's internal extractor is prone to lose tension and is dependent on a skilled assembler for proper setup. Failing the extractor test indicates that at best, the extractor is only working marginally. Should the extractor have any less tension, the gun will stop working altogether.
2. A marginal extractor has a less than optimal grip on the case rim during extraction, and in a 1911, the case will be pulled into the feed lips of the empty magazine, creating the stoppage in the photo above. The feed lip geometry and concave or flat magazine follower of the 1911 magazine makes the 1911 more prone to this than any other modern service pistol. It is a bear to clear, and destroys your magazine as it will permanently deform your feed lips.
Does the test apply to modern service pistols?
Some shooters have noted that quality modern pistols will not pass this test. This is not as much of an issue as with the traditional 1911 for the following reasons:
1. The coil spring setup of the modern external extractor is not prone to loss of tension like the leaf spring setup of the internal 1911 extractor. Once a pistol is set up from the factory, what you get (in terms of extractor function) on day one is what you will get until something breaks.
2. The feed lip and follower geometry of modern service pistols do not make them prone to having the empty case dragged into the feed lips should the extractor lose grip on the case rim during extraction.
What about 1911s with external extractors?
This test is the Achilles' Heel of most 1911 external extractor setups. The only external extractor setup that I have tried that will reliably pass this test is the Smith and Wesson E-Series pistol, which uses the wide Performance Center extractor and is optimally positioned in the slide. Many 1911 external extractor designs do not optimally position the extractor relative to the bore axis resulting in marginal extractor function.
While the external extractor setup is not likely to lose tension, the marginal extractor function is still coupled with the geometry of the 1911 feed lips resulting in the malfunction depicted in the photo atop this blog post.
In other words, if you have a 1911 outfitted with an external extractor, and it fails this test, it is NOT good to go. It will be prone to pulling into the feed lips, the empty case of last round fired in the pistol.
In other words, if you have a 1911 outfitted with an external extractor, and it fails this test, it is NOT good to go. It will be prone to pulling into the feed lips, the empty case of last round fired in the pistol.
Final Thoughts
The "experts" on the Internet have said "oh wow, so this test just proves the gun will only fire one round with no magazine in place. When would I ever shoot the gun in this manner?" Realize that this test was designed from the perspective of evaluating whether or not a 1911 pistol properly setup for service. We are not advocating shooting the gun in this manner as any sort of technique in and of itself.
Every 1911 that comes across Hilton's or my bench is tested for this and doesn't leave the shop unless the extractor is properly set up.
If you are still unclear as to the significance of this test, please carefully re-read this blog post. I hope this sheds some light onto this commonly misunderstood function test.
Special thanks to my good buddy Hilton for his input on this blog post. Please visit the 10-8 Performance Facebook Page and his blog at http://10-8performance.blogspot.com/.
Special thanks to my good buddy Hilton for his input on this blog post. Please visit the 10-8 Performance Facebook Page and his blog at http://10-8performance.blogspot.com/.
Tim Lau
10-8 Consulting, LLC
10-8 Consulting, LLC
Thursday, April 19, 2012
Wilson Tactical Training: Defense Fit
 |
| Hilton engages multiple targets with the SIRT Pistol while I begin my weighted box jumps/steps in this DefenseFit session. |
Too many times I have either attended or taught firearms courses with students, wishing to learn how to survive a deadly force encounter, who would be better served walking around the block. Don't get me wrong, anyone serious about personal safety should have a baseline level of firearms knowledge and I applaud anyone willing to spend their own money and take the time to better themselves by attending a firearms class. However, there are many folks who wrap themselves around the axle about caliber selection or the best way to put down multiple armed attackers when the reality is, given their physical condition, they are far more likely to die of a heart attack or slip into a diabetic coma than find themselves in the middle of a home invasion robbery.
Good physical fitness is as important as skill at arms, and greatly improves quality of life. In addition, it significantly contributes to our ability prevail should we find ourselves in a life or death struggle, and it increases our survivability should we become injured in such an encounter. Unfortunately, it seems many firearms enthusiasts and students completely ignore this area of training.
Last month, my good friend Hilton Yam and I were teaching a 10-8 Duty 1911 Course in the greater Seattle area, and had the opportunity to train with Jeremy Wilson of Wilson Tactical Training. When he offered to put us through a sample of his DefenseFit program, we seized the opportunity. Wilson Tactical Training's DefenseFit program incorporates functional strength and cardiovascular training with defensive tactics and shooting skill development. The idea is not only to get a great workout, but to produce physical stress to simulate what one would feel in a self defense or lethal force encounter.
Hilton and I arrived at one of the training facilities Jeremy Wilson uses to teach his courses on Sunday morning and met Jeremy for the first time. Jeremy is a full time police officer with over 13 years of experience, serving as a SWAT operator, use of force instructor, firearms instructor, and holds numerous instructor and armorer certifications. He is also a longtime student of the martial arts. He explained what we would be doing and told us he would give us a sampler plate of what his courses have to offer.
We put on our concealed carry rigs, which consisted of a CompTac belt holster and magazine pouches underneath a concealment garment. We would be using Next Level Training's SIRT Pistol. SIRT stands for Shot Indicating Resetting Trigger. The SIRT pistol is an inert training pistol that features a self-resetting trigger and a laser indicator. The external shape and dimensions resemble a Glock 17. It uses weighted, inert training magazines that fit in G17 magazine pouches (as well as the actual Glock 17). This training aid allows the student to safely perform exercises and force on force drills, yet the laser indicator keeps the training realistic. Misses are called as misses by the instructor, which usually means the student is doing pushups!
Hilton and I started with a five minute warmup on the rowing machines, then progressed to the medicine ball exercises. Agility and weighted box jump drills integrated with multiple shot engagements were next. We continued with clinch drills, firearm retention drills, sprints, shooting on the move, and marksmanship/gunhandling drills integrated between the exercises. Ground defense drills, positional shooting on the VTAC 9-hole wall, and air squats rounded out our session, which lasted over thirty minutes with only very short water breaks in between.
The training highlighted the difficulty of making technical shots requiring fine trigger control and forced me to focus on fundamentals, while battling fatigue and coping with an elevated heart rate. It reminded me of what instructors used to do to us in the police academy: using physical exhaustion to simulate stress. It worked then, and it still works now.
If you have not integrated your workout program with defensive marksmanship skills, you are missing out on a highly effective training method. Use your imagination and try it. And if you are anywhere near the Pacific Northwest, seek out Wilson Tactical Training and check out their DefenseFIT program. It will open your eyes and just might save your life.
 |
| NextLevel Training's SIRT Pistol is an integral part of the DefenseFit program. |
Source:
Wilson Tactical Training
Saturday, April 14, 2012
Bullseye Shooting and the Importance of Basic Marksmanship
 |
| My target after the 25-yard portion of the FBI Bullseye Course |
It isn't nearly as exciting to shoot slow fire groups at 20 or 25 yards, but I have learned this skill separates the "men from the boys" especially in the police firearms training world.
One of my favorite courses of fire to evaluate Basic Marksmanship skills is the FBI Bullseye Course. It is not fancy, but it is a great evaluation of the shooter's understanding and application of sight alignment and trigger control.
The course is simple and is scored on an FBI Bullseye target (similar in dimensions to an NRA 25 yard rapid fire pistol target). All stages begin with pistol aimed in, safety off, finger on the trigger. This is not a tactical course but rather one that evaluates a specific skill set.
The course is as follows. All shots are standing, freestyle.
25-yards, 10 rounds, 4 minutes.
15-yards, 5 rounds, 15 seconds. Do this twice.
15-yards, 5 rounds, 10 seconds. Do this twice.
Total possible score, 300 pts. Passing for instructors is 270.
Download and print the 10-8 Bullseye Target which has the same scoring dimensions as the FBI Bullseye and try it out! If I remember correctly, my best score ever on this course of fire was in the mid 290's. Let us know how you like it and what your score is!
Thursday, April 12, 2012
Our Take On AR-15/M16 Magazines
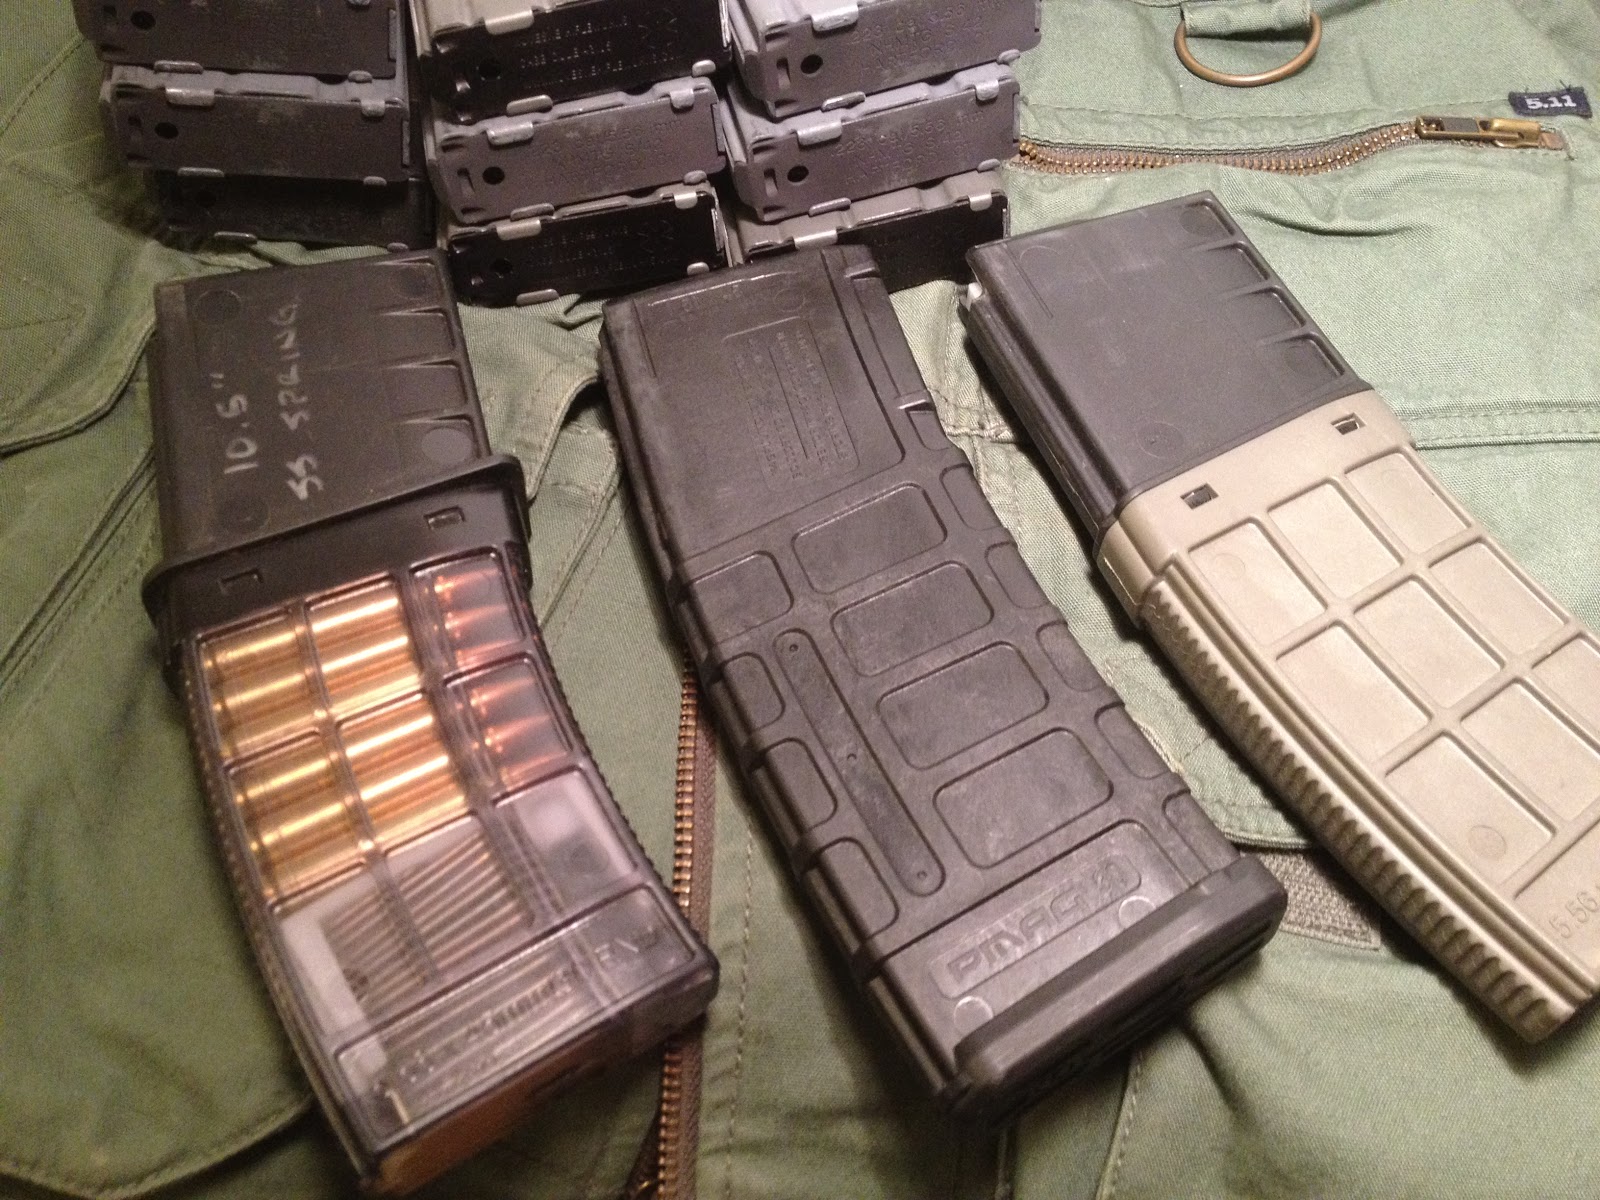 |
| L to R: Clear TangoDown Mag, MagPul P-Mag, and Standard TangoDown Mag |
Fast forward to the present, and magazine prices are back down and there are more choices in M16 magazines than ever before. The latest craze is the utilization of high tech plastics that are lighter and stronger than ever before. Going the other direction, some manufacturers have gone to steel.
Some popular magazines include the MagPul Magazine, TangoDown ARC Mag, Troy Battlemag, Lancer L5 magazine, C-Products' steel magazine, and the HK 416 magazine. With all these choices in magazines, it is tough to choose what is best. Unfortunately, there isn't a 100% answer.
Here is a non-comprehensive review of some of the mags we have had some experience with. This is not meant to be an all encompassing review of every magazine on the market, but rather, my general approach to choosing a magazine suitable for my mission, which is primarily range/training use, LE duty use, and self defense.
 |
| Prototype Translucent TangoDown ARC Mag and MagPul MagLevel |
TangoDown ARC Mag
Our friends at TangoDown have an innovative polymer M16 magazine called the ARC magazine. It is designed to survive drops, while fully loaded, onto its feed lips, and hold up to the hard knocks of LE duty and military use. I have found the magazine to be quite durable and repeated drops, even when fully loaded, onto concrete have no ill effects on reliability.
A common complaint is that it can't be taken down for cleaning. The reality is this is a non-issue as a quick rinse or a couple passes with a KleenBore magazine brush and it is good to go. Some question the integrity of a two-piece design, but I have yet to see one come apart. The halves are unitized with a high strength bonding agent and also feature a physical backup system of four tabs.
The only issue I see is that the follower hump is on the left side, which differs from the blue million legacy USGI magazine on the market and in circulation. Yes, this can be chalked up to a training issue, but the reality is that most people (cops, especially) are mentally lazy and there is a likelihood of cramming 31 rounds in the magazine, stopping the show altogether. Yes, the new Army "tan" follower is also on the "wrong" side, but there really aren't many of those on the market to make a difference.
Some early versions of the ARC magazine exhibited feeding problems in some guns, but my experience with the latest production magazines tell me they are excellent.
MagPul P-Mag
These guys started it all. Before them, the only polymer magazines on the market were made by Thermold and Orlite, neither of which were very reliable or durable. The P-mag set the new standard for reliability in polymer M16 magazines. They are designed with an extremely stable follower, robust spring, and a polymer body that is tough as nails. It can be loaded to thirty rounds yet can still be seated in a magazine with the bolt forward.
I like these magazines a lot and would not hesitate to put them to use at work or home. They are available with or without a window on the side that allows the shooter to quickly gauge the number of rounds left in the magazine. Really brilliant.
HK High Reliability 416 Magazine
I have had quite a bit of experience with this magazine. It is made of steel, has a stainless anti-tilt follower, is slightly longer, and coated with HK's black, corrosion resistant finish. The latest generation has a black follower and a rubber insert to keep the base pad in place.
This magazine works great when new. Unfortunately, over time, the springs take a set and fail to provide enough lift on the follower to lock the bolt to the rear when the magazine is empty. I have seen this contribute to feeding malfunctions. Drop the magazine on its feed lips even when partially loaded, will result in their bending, rendering the magazine useful only as an interesting paper weight.
So What to Buy?
There are a gaggle of other magazines on the market, made of plastic, aluminum or stainless steel. Some work great, others, not so much. What will you find in my range bag? I have found it hard to get away from the GI magazine. From various dealers, such as 44mag.com or Bravo Company USA, they are available for about $10 a piece. In my experience, they work great when new and they stay working for a long time. When they stop working, I toss them and buy new ones. As Pat Rogers likes to say, if you ever come across a used M16 magazine at a gun show with my name scribbled on it, don't buy it!
Don't fall in love with your magazines. At $10 a piece, GI magazines are cheaper than nearly every other magazine on the market and are easily replaced. Which brand to buy? I have had great experiences with Colt marked magazines, NHMTG magazines, and D&H magazines. For what I use them for, I have not found much of a functional difference between the teflon and the dry film coated versions.
Do you have a favorite magazine? Tell us in the comments!
Tim Lau
10-8 Consulting, LLC
Sources:
TangoDown LLC
Magpul Industries
44mag.com
Bravo Company USA
Monday, April 9, 2012
Tool of the Trade: The Shot Timer
 |
| Various shot timers I have used over the years |
It never ceases to amaze me when I meet a firearms instructor or self professed serious shooter who does not own a shot timer. Some have never even heard of one, let alone actually have one in their range kit. So first things first, what is a shot timer? An electronic shot timer is a device that gives off a start signal (usually a loud beep) and then listens for shots and records the time. Devices range from super fancy (like the PACT MK IV, that has more computing power than the mainframe that launched the first space shuttle) to simple like the PACT Club Timer III. There are even apps for the iPhone that will do the same thing.
Why a shot timer? As shooters, we are always trying to pursue that elusive balance: the perfect combination of speed and accuracy. Well, accuracy we can measure. We can look at holes in a paper target or listen for that satisfying ding on that steel plate. Without a shot timer, we will never know what we are capable of in terms of speed. Feeling fast and actually being fast are two very different things. If you watch a top level competitor draw and fire, it does not look all that fast. But the timer doesn't lie. The reason for this is because that USPSA Grand Master is not fast because of sheer hand velocity, but rather, he has found the most efficient path in which to move. It is economy of motion. And there is no way to accurately measure this without a shot timer.
Without a shot timer, there is also no way to measure progress. With only a paper target to measure my ability, I can't tell if I am making any gains in terms of speed. I don't know if my first round hits out of the holster are in 2.0 seconds or 1.5. With the shot timer, I am able to measure my ability. I can map out my theoretical times based on my ability to perform certain tasks. For example, if I know that my first round hit out of a holster takes me 1.1 seconds, and my split times are .20 seconds, I should be able to complete a Bill Drill (six rounds from the holster on an 8-inch plate at 7-yards) in 2.1 seconds or so. Sun Tzu famously wrote, "If you know your enemy and know yourself, you need not fear the result of a hundred battles." The timer gives me the ability to know myself, to know what I am capable of and what I am not.
With all that in mind, it is also important not to get too wrapped around the axle about times. The timer is simply a way to measure mechanical skill, but speed should not replace accuracy or proper tactics. Don't get so wrapped up in shaving every tenth of a second off your times if it means you are giving up safety, tactical advantage, or consistency. Just because a technique is faster does not necessarily mean it is better for fighting; however, it is still important to have and use a timer to evaluate proficiency and efficiency when performing a particular task, such as an emergency reload or transitioning between targets.
Lastly, that shot timer adds stress. Anyone who has had shot on the timer knows the stress of being under the clock. This is a good way to add stress to your training and to evaluate your performance under that stress.
Which timer to get? A simple timer is the PACT Club Timer III. It features big, easy to activate buttons. Par times (times that you strive to meet, and are indicated by a second beep,) are easily set and the big LED display is easy to read. It is a good choice. I had previously been using the discontinued CED 6000, but it is getting a bit long in the tooth and some of the LCD elements have gone dead. For a do-everything timer, the PACT MK IV Championship Timer is the Cadillac of them all. It does everything including measure rate of fire, save strings of results, and can act as a chronograph if you have the screens to hook up to it. The only downside is that the MK IV will drain the battery even when dormant, so you will need to remember to take the battery out between range sessions.
At the suggestion of my good friend Hilton, I am also using the new CED 7000. It does everything my old 6000 did but in a smaller, more portable package. It has an internal rechargeable battery which I am not sure I like since that means I have to take it out of my range bag and plug it into the wall rather than just shove new batteries in it. The buttons are small and look somewhat cheap but the display is big enough to read and the small size and light weight are a plus. The timer does not come with a belt clip, which must be purchased for an additional $15 or so. That is a fail in my book, but I bit the bullet and it seems to be working okay.
If you have an iPhone, SureFire has a free shot timer app that works in a pinch. While it will not replace a dedicated shot timer, it will work in a pinch. I use the par timer function on it for dry practice training with my SIRT pistol. The volume can be adjusted in the app for indoor dry practice in my living room and won't blow out everyone's ear drums. It is in the App Store so check it out.
If you are truly a student of the gun, make sure you have a shot timer in your range bag and USE it.
Resources:
Competitive Edge Dynamics (CED)
PACT Timers
Sunday, April 8, 2012
Compensators: Range Toy or Legitimate Tool?
 |
| A well-used BattleComp 2.0 |
Back in August 2011, I was introduced to the guys over at BattleComp while at a shooting course. The thing that immediately stood out about them is that they are shooters. Not only do they have many decades of law enforcement experience, but they love to shoot and train. And they are good at it. I couldn't (and didn't) pass up the opportunity to try a couple of their products.
Now before I go any further, I have always been skeptical about using compensators for anything other than gun games or range toys. I have tried half a dozen different types and shot next to many more compensators and all have shaken my fillings loose to one degree or another. Recently, I was zeroing an optic next to a shooter with a rifle equipped with a SureFire MB556K and it was like being punched in the face every time he pulled the trigger.
Compensators reduce muzzle climb to varying degrees, but experience has told me that they also act as flash, noise and concussion enhancers. So despite really liking the BattleComp guys, I didn't have high expectations; my bad experience with all other compensators for the AR/M4 platform had left me underwhelmed at best. I expected the BattleComp to tame muzzle rise a bit, but also enhance the flash and produce unacceptable concussion to the sides. In a single man competition, this may be annoying to bystanders. In a tactical entry or team environment, the enhanced blast could render your partner unable to fight.

So it was with more than a little skepticism that I attached a BattleComp 2.0 to my rifle. After several trips to a couple different ranges, both indoors and out, I am impressed. As a compensator, the BatteComp does its job in spades. The muzzle does not climb at all. It simply needs to be shot to be believed. I put a BattleComp equipped rifle in my buddy Dean Caputo's hands. I captured his spontaneous reaction on the video below.
As for measurable increase in performance, if the shooter has reasonable control of the rifle through stance and grip (and good trigger control) the BattleComp will allow the average trained shooter to keep rounds on an 8-inch target at 7 yards as fast as he can manipulate the trigger.
This performance does come at some cost. Flash is slightly more than an A2, but not objectionably so. Concussion is also somewhat increased, but it is not terrible. At Pat McNamara's recent class here in Southern California, Centurion Arms' Monty LeClair stood right next to my BattleComp and asked me to light off a few rounds. In the name of science, I was more than happy to do so. He reported it was definitely an increase over an A2, but it wasn't bad at all.
If you get the chance, absolutely try one out and see if the reduced muzzle climb is worth the mild increase in flash and concussion. If you're anything like me, I think you'll be making a phone call to the boys over at BattleComp.
Here are a couple videos to illustrate the point. Have you tried a BattleComp? Let us know in the comments!
Glock 17 vs. M&P 9?
 |
| Glock 17 RTF vs. S&W M&P 9 |
A couple days ago, the Vuurwapenblog responded to GunNuts Media blogger Shelley Sargent's question: Why the M&P?. Shelley eloquently highlights some of the advantages of the M&P over the Glock, including truly ambidextrous controls, interchangeable backstraps to accommodate different sized hands, and location of manufacture.
I own both, and having put many rounds through multiple copies of both models (and with all due respect to Shelley, whom we at 10-8 hold in high regard,) I have to side with the Vuurwapen blogger on this one, mainly due to the accuracy issues of the M&P 9mm. With nearly any box stock Glock 17, I can hold better than three inches at 25 yards using factory ammunition. With most M&Ps, my groups at the same distance using the same ammunition is around eight inches.
To add insult to injury, most M&Ps come with nearly unusably bad triggers out of the box. The end user must either send the pistol back to the S&W Performance Center for a sear upgrade, or purchase the excellent Apex Tactical Hard Sear to have a pistol with a decent trigger. Glocks consistently come with workable triggers right out of the box.
That said, the M&P in 45 caliber is extremely accurate and if mated with a Performance Center (or better yet, an Apex Tactical sear), the trigger is good to excellent. Make a M&P 9mm with a Performance Center Sear with the accuracy of an M&P 45 and I will be sold. Until then, the Glock 17 wins this battle of the fantastic plastic nine millimeters.
Visit the Gun Nuts Media Blog and Vuurwapen Blog and tell us what you think!
Tim Lau
10-8 Consulting, LLC
Tuesday, April 3, 2012
Laser Devices Visible and IR Lasers
 |
| Laser Devices DBAL-I2 |
Just got a pile of Laser Devices products in for evaluation. I have long been a fan of visible lasers on pistols as a secondary sighting system for asymmetrical positions or special circumstances where the use of traditional iron sights is difficult or impossible. Laser Devices offers visible and IR laser designators for various applications for LE/Military and now offers various products with FDA approved "eye-safe" output.
Stay tuned for a comprehensive review of the DBAL, OTAL, and the CQBL. Yeah, my life is tough...

Glocks Available in Flat Dark Earth
For you Glock shooters (I am a closet Glock fan as well), Lipsey's has contracted a run of Glock factory pistols in Flat Dark Earth. They will be available in nine different models that span both Gen 3 and Gen 4 lines.
Due to the expense involved, it is not likely they will be CA approved.

Due to the expense involved, it is not likely they will be CA approved.
Sunday, April 1, 2012
Reworked: Springfield "Long Beach" Operator
 |
| Springfield Armory "Long Beach" Model Ready for Duty |
Recently, a K-9 officer I had worked with when I was a Gang Detective purchased a Springfield "Long Beach" Operator model 1911. This model is was made at the request of Long Beach (CA) PD officers who essentially wanted an MC Operator but in an all black package. It is built with higher grade parts (and workmanship) than the typical "Loaded" model pistols, and is pretty close to being ready for duty. However, it still needed some intervention by skilled hands before it was ready for duty.
At a recent 10-8 Duty 1911 (Transition) course, this pistol could not pass the 10-8 Function Test Protocol. The factory extractor would not hold tension, and had to be replaced with a Wilson Bulletproof unit. Once the new extractor was fitted, it was good to go until the gun got hot and dry. Then it would hang up in the feed cycle. The owner asked me to look it over and I agreed.
The first thing I did was check headspace, which was in spec. Then I ran a Manson Finishing Reamer, which will recut the chamber to SAAMI spec. I have yet to drop this reamer in a factory barrel and not have it remove metal. In my opinion, this is cheap insurance to help the gun chamber and lock up when hot, dry and dirty. I looked at the barrel throat and saw it could use a little reprofiling. While I gave it a pretty high polish, this is not necessary. It is critical to have correct geometry as no amount of polishing will fix poor feed ramp or barrel throat geometry.
Here is what the throat looked like prior to reprofiling.

Here it is after:

One look at the feed ramp and it was obvious it was out of spec. The bottom of the ramp should be around .400" below the top of the frame rails. An easy way to eyeball this is to see if the bottom edge feed ramp is about even with the window for the slide stop lobe. As seen in the photo below, this one wasn't even close. You can get away with this if all you shoot is ball ammo, or non-aggressive hollow points, but if you want to shoot a variety of aggressive bullet profiles, this is a recipe for a feed way stoppage.

Here is the same frame after the feed ramp is recut and polished. Again, the polishing is really a feel good measure, and not important. Much more critical is the proper angle. Since I lack machines, this feed ramp was recut by hand with a Dremel. Polishing was carefully done by hand with paper and then a felt wheel.

Other mods include changing out the torn head grip screws with flat head ones (I don't carry torx drivers with me on the range) and relieving the grip panels to exposed the MSH pin. This particular pistol did not have enough trigger travel rearward to clear the sear for the safety shelf. Without going into a long treatise, this is a dangerous situation that could result in a broken sear nose. In this case, I had to clearance the grip safety arm as the trigger bow was running into it.
A couple hours of work and the pistol was ready for test fire. It passed the 10-8 1911 Function Test Protocol with flying colors. I am confident that with the proper preventative maintenance cycle, and good magazines, this pistol should serve its new owner well for many years to come.
Tim L
10-8 Consulting, LLC
SIRT Performer Training Pistol
 |
| Next Level Training's SIRT Performer |
We at 10-8 have been training quite a bit with the SIRT pistol over the past several months and have attributed our increased skills directly to the addition of the SIRT to our training regimen. When it comes to effective training, it really does come down to training quality movement in high volume. The SIRT removes barriers to dry practice training. Because it is not an actual pistol, it does not pose a safety hazard and there are no worries about dinging up your walls with airsoft pellets or worse yet, unintentionally launching a round into your wife's priceless grandfather clock.
Visit NextLevelTraining.com and check out all the SIRT products to find out which one is right for you. A hint: red/red works great for indoors and green/red is better at outdoor training as the green laser is much more visible than the red laser in bright outdoor conditions.
When you order, use the "10-8" coupon code to receive your discount. If you are active duty Law Enforcement, email SIRTPromo@10-8performance.com for a special code to get an additional discount!
Tim Lau
10-8 Consulting, LLC
Latest Custom 1911 Build Back From Ion Bond

Other parts include an EGW HD Hammer, Sear and Disconnector, 10-8 flat trigger, 10-8 rear sight, 10-8 fiber optic front, 10-8 mag catch, 10-8 grip screws, 10-8 slide stop, 10-8 recoil spring plug, an aggressively recontoured Wilson Combat ambi-safety, CMC grip safety, and STI hammer strut.
Thanks to Monty at Centurion Arms for his help with the recessed barrel crown and flush cut slide stop pin. Having him help me with the machine work for these operations sure beats doing it by hand.
After a comprehensive test fire, I used the pistol in the white at the LAV/Hackathorn 1911 Centennial Class in Chino, CA. It ran perfectly, so I got it ready for refinishing. I sent it off to Springer Precision in Bend, OR, one of the big resellers of Ion Bond's Diamondblack finish. I normally do all my own surface prep, but Ion Bond requires very specific preparation which includes no glass in the abrasive media and no oil on the gun. I did the initial prep, but had Springer Precision do the final blast with glass free media.
It isn't cheap, but DiamondBLACK offers some of the best abrasion resistance of any coating on the market. it is applied via Particle Vapor Deposition and adds very little thickness (only a few microns) to the surface, which is handy for painstakingly fitted parts such as the slide/frame fit. While it does not have great inherent corrosion resistance, the surface readily absorbs lubricants and will release it over time.
Due to the many hours of hard work invested, I am always hesitant to send away work for refinishing, but I bit the bullet and sent it off. Seven weeks later, I received the pistol and I must say it looks great. The satin black finish is even and attractive. The price tag was kinda steep, but if it holds up as well as I have heard from trusted sources, it will have been worth it.
 |
| I heavily recontoured the Wilson wide ambi-safety which came out real nice |
 |
| Using the dreaded Dremel, I lowered the ejection port and cut the scallop by hand |
 |
| Monty from Centurion Arms helped with the recessed crown, a custom touch I've always liked. |
 |
| Note the detailed dehorning of areas typically ignored. If I can see it or touch it, it will be addressed. |
Subscribe to:
Posts (Atom)